- C# (pronounced as "C sharp") is a modern, versatile, and object-oriented programming language developed by Microsoft.
- It was introduced in the early 2000s as part of the Microsoft .NET initiative and has since become a popular choice for developing a wide range of applications, including Windows applications, web applications, games, and more.
C# | Identifiers
In programming languages, identifiers are used for identification purposes. Or in other words, identifiers are the user-defined name of the program components. In C#, an identifier can be a class name, method name, variable name, or label.
Example:
public class GFG {
    static public void Main ()
    {
          int x;
    }
}
Here the total number of identifiers present in the above example is 3 and the names of these identifiers are:
- GFG: Name of the class
- Main: Method name
- x: Variable name
Rules for defining identifiers in C#:
There are certain valid rules for defining a valid C# identifier. These rules should be followed, otherwise, we will get a compile-time error.
- The only allowed characters for identifiers are all alphanumeric characters([A-Z], [a-z], [0-9]), ‘_‘ (underscore). For example “geek@” is not a valid C# identifier as it contain ‘@’ – special character.
- Identifiers should not start with digits([0-9]). For example “123geeks” is not valid in the C# identifier.
- Identifiers should not contain white spaces.
- Identifiers are not allowed to use as keywords unless they include @ as a prefix. For example, @as is a valid identifier, but “as” is not because it is a keyword.
- C# identifiers allow Unicode Characters.
- C# identifiers are case-sensitive.
- C# identifiers cannot contain more than 512 characters.
- Identifiers do not contain two consecutive underscores in their name because such types of identifiers are used for the implementation.
Example:
Output:
The sum of two number is: 49
Below table shows the identifiers and keywords present in the above example:
| Keywords | Identifiers |
|---|---|
| using | GFG |
| public | Main |
| static | a |
| void | b |
| int | c |
C# | Data Types
Data types specify the type of data that a valid C# variable can hold. C# is a strongly typed programming language because in C#, each type of data (such as integer, character, float, and so forth) is predefined as part of the programming language and all constants or variables defined for a given program must be described with one of the data types.
Data types in C# is mainly divided into three categories
- Value Data Types
- Reference Data Types
- Pointer Data Type
- Value Data Types : In C#, the Value Data Types will directly store the variable value in memory and it will also accept both signed and unsigned literals. The derived class for these data types are System.ValueType. Following are different Value Data Types in C# programming language :
- Signed & Unsigned Integral Types : There are 8 integral types which provide support for 8-bit, 16-bit, 32-bit, and 64-bit values in signed or unsigned form.
Alias Type Name Type Size(bits) Range Default Value sbyte System.Sbyte signed integer 8 -128 to 127 0 short System.Int16 signed integer 16 -32768 to 32767 0 Int System.Int32 signed integer 32 -231 to 231-1 0 long System.Int64 signed integer 64 -263 to 263-1 0L byte System.byte unsigned integer 8 0 to 255 0 ushort System.UInt16 unsigned integer 16 0 to 65535 0 uint System.UInt32 unsigned integer 32 0 to 232 0 ulong System.UInt64 unsigned integer 64 0 to 263 0 Floating Point Types :There are 2 floating point data types which contain the decimal point.
- Float: It is 32-bit single-precision floating point type. It has 7 digit Precision. To initialize a float variable, use the suffix f or F. Like, float x = 3.5F;. If the suffix F or f will not use then it is treated as double.
- Double:It is 64-bit double-precision floating point type. It has 14 – 15 digit Precision. To initialize a double variable, use the suffix d or D. But it is not mandatory to use suffix because by default floating data types are the double type.
Alias Type name Size(bits) Range (aprox) Default Value float System.Single 32 ±1.5 × 10-45 to ±3.4 × 1038 0.0F double System.Double 64 ±5.0 × 10-324 to ±1.7 × 10308 0.0D - Decimal Types : The decimal type is a 128-bit data type suitable for financial and monetary calculations. It has 28-29 digit Precision. To initialize a decimal variable, use the suffix m or M. Like as, decimal x = 300.5m;. If the suffix m or M will not use then it is treated as double.
Alias Type name Size(bits) Range (aprox) Default value decimal System.Decimal 128 ±1.0 × 10⁻²⁸ to ±7.9228 × 1028 0.0M - Character Types : The character types represents a UTF-16 code unit or represents the 16-bit Unicode character.
Alias Type name Size In(Bits) Range Default value char System.Char 16 U +0000 to U +ffff ‘\0’
Example :
Output :
char: G
integer: 89
short: 56
long: 4564
float: 3.733064
double: 8.358674532
decimal: 389.5
Unsinged integer: 95
Unsinged short: 76
Unsinged long: 3624573
Example :
Output :
126
127
-128
-127
Example :
Output :
0
1
255
0
- Signed & Unsigned Integral Types : There are 8 integral types which provide support for 8-bit, 16-bit, 32-bit, and 64-bit values in signed or unsigned form.
- Boolean Types : It has to be assigned either true or false value. Values of type bool are not converted implicitly or explicitly (with casts) to any other type. But the programmer can easily write conversion code.
Alias Type name Values bool System.Boolean True / False Example :
Output :
Hi Geek
- Reference Data Types : The Reference Data Types will contain a memory address of variable value because the reference types won’t store the variable value directly in memory. The built-in reference types are string, object.
- String : It represents a sequence of Unicode characters and its type name is System.String. So, string and String are equivalent.
Example :string s1 = "hello"; // creating through string keyword String s2 = "welcome"; // creating through String class
- Object : In C#, all types, predefined and user-defined, reference types and value types, inherit directly or indirectly from Object. So basically it is the base class for all the data types in C#. Before assigning values, it needs type conversion. When a variable of a value type is converted to object, it’s called boxing. When a variable of type object is converted to a value type, it’s called unboxing. Its type name is System.Object.
Example :
Output :
GeeksforGeeks
20
System.Int32
- String : It represents a sequence of Unicode characters and its type name is System.String. So, string and String are equivalent.
- Pointer Data Type : The Pointer Data Types will contain a memory address of the variable value.
To get the pointer details we have a two symbols ampersand (&) and asterisk (*).
ampersand (&): It is Known as Address Operator. It is used to determine the address of a variable.
asterisk (*): It also known as Indirection Operator. It is used to access the value of an address.
Syntax :type* identifier;
Example :
int* p1, p;   // Valid syntax
int *p1, *p;   // Invalid
Example :
C# | Variables
A typical program uses various values that may change during its execution. For example, a program that performs some operations on the values entered by the user. The values entered by one user may differ from those entered by another user. Hence this makes it necessary to use variables as another user may not use the same values. When a user enters a new value that will be used in the process of operation, can store temporarily in the Random Access Memory of computer and these values in this part of memory vary throughout the execution and hence another term for this came which is known as Variables. So basically, a Variable is a placeholder of the information which can be changed at runtime. And variables allows to Retrieve and Manipulate the stored information.
Syntax:
type variable_name = value;
or
type variable_names;
Example:
char var = 'h'; // Declaring and Initializing character variable
int a, b, c; // Declaring variables a, b and c of int type
Characteristics of Variables:
- name : It must be a valid identifier. In above example, var is a valid identifier.
- type : It defines the types of information which is to be stored into the variable. In above example char is a type.
- value : It is the actual data which is to be stored in the variable. In above example ‘h’ is the value.
Rules for Naming Variables
- Variable names can contain the letters ‘a-z’ or ’A-Z’ or digits 0-9 as well as the character ‘_’.
- The name of the variables cannot be started with a digit.
- The name of the variable cannot be any C# keyword say int, float, null, String, etc.
Examples:
- Valid Variables Names
int age;

float _studentname;
- Invalid Variables Names
int if; // "if" is a keyword

float 12studentname; // Cannot start with digit
Defining or Declaring a Variable
There are some rules that must be followed while declaring variables :
- specify its type (such as int)
- specify its name (such as age)
- Can provide initial value(such as 17)
Example :
int geeks;
float interest;
Initializing Variables
The term initializing means to assign some value to the variable. Basically, the actual use of variables comes under the initialization part. In C# each data type has some default value which is used when there is no explicitly set value for a given variable. Initialization can be done separately or may be with declaration.
Example :
int y = 7; // Declaring and initializing the variable at same time
int x; // Declaring variable x
x = 5; // initializing x with value 5
Two Ways for Initialization:
- Compile time initialization
- Run time initialization
1. Compile Time Initialization
It means to provide the value to the variable during the compilation of the program. If the programmer didn’t provide any value then the compiler will provide some default value to the variables in some cases. Generally, this type of initialization helpful when the programmer wants to provide some default value.
Example :
Output :
Value of x is 32
Value of y is 0
2. Run Time Initialization
In this, the user has to enter the value and that value is copied to the required variable. In this type of initialization, there is one more possibility in which value is assigned to variable after completion of a function call.
Example:
Input : 45
Output : Value of num is 45

Input : 27
Output : Value of num is 27
Output :
Value of num is 45
C# | Literals
The fixed values are called as Literal. Literal is a value that is used by the variables. Values can be either an integer, float or string, etc.
// Here 100 is a constant/literal. int x = 100;Literals can be of the following types:
- Integer Literals
- Floating-point Literals
- Character Literals
- String Literals
- Null Literals
- Boolean Literals
Integer Literals: A literal of integer type is known as the integer literal. It can be octal, decimal, binary, or hexadecimal constant. No prefix is required for the decimal numbers. A suffix can also be used with the integer literals like U or u are used for unsigned numbers while l or L are used for long numbers. By default, every literal is of int type. For Integral data types (byte, short, int, long), we can specify literals in the ways:
- Decimal literals (Base 10): In this form, the allowed digits are 0-9.
int x = 101;
- Octal literals (Base 8): In this form, the allowed digits are 0-7.
// The octal number should be prefix with 0. int x = 0146;
- Hexa-decimal literals (Base 16): In this form, the allowed digits are 0-9 and characters are a-f. We can use both uppercase and lowercase characters. As we know that c# is a case-sensitive programming language but here c# is not case-sensitive.
// The hexa-decimal number should be prefix // with 0X or 0x. int x = 0X123Face;
- Binary literals (Base 2): In this form, the allowed digits are only 1’s and 0’s.
// The binary number should be prefix with 0b. int x = 0b101Examples:
07778 // invalid: 8 is not an octal digit 045uu // invalid: suffix (u) is repeated 0b105 // invalid: 5 is not a binary digit 0b101 // valid binary literal 456 // valid decimal literal 02453 // valid octal literal 0x65d // valid hexadecimal literal 12356 // valid int literal 304U // valid unsigned int literal 3078L // valid long literal 965UL // valid unsigned long literalProgram:
- C#
101 145 64206 5Floating-point Literals: The literal which has an integer part, a decimal point, a fractional part, and an exponent part is known as the floating-point literal. These can be represented either in decimal form or exponential form.
Examples:
Double d = 3.14145 // Valid Double d = 312569E-5 // Valid Double d = 125E // invalid: Incomplete exponent Double d = 784f // valid Double d = .e45 // invalid: missing integer or fractionProgram:
- C#
Output:
101.23 123.222Note: By default, every floating-point literal is of double type and hence we can’t assign directly to float variable. But we can specify floating-point literal as float type by suffixed with f or F. We can specify explicitly floating-point literal as the double type by suffixed with d or D, of course, this convention is not required.
Character Literals: For character data types we can specify literals in 3 ways:
- Single quote: We can specify literal to char data type as single character within single quote.
char ch = 'a';
- Unicode Representation: We can specify char literals in Unicode representation ‘\uxxxx’. Here xxxx represents 4 hexadecimal numbers.
char ch = '\u0061';// Here /u0061 represent a.
- Escape Sequence: Every escape character can be specified as char literals.
char ch = '\n';
Escape Sequence Meaning \\ \ character \’ ‘ character \? ? character \” ” character \b Backspace \a Alert or Bell \n New Line \f Form Feed \r Carriage Return \v Vertical Tab \xhh… Hexadecimal number of one or more digits Example :
- C#
a a Hello Geeks !String Literals: Literals which are enclosed in double quotes(“”) or starts with @”” are known as the String literals.
Examples:
String s1 = "Hello Geeks!"; String s2 = @"Hello Geeks!";Program:
- C#
Output:
Hello Geeks! Hello Geeks!Boolean Literals: Only two values are allowed for Boolean literals i.e. true and false.
Example:
bool b = true; bool c = false;Program:
- C#
Output:
True FalseC# | Operators
Operators are the foundation of any programming language. Thus the functionality of C# language is incomplete without the use of operators. Operators allow us to perform different kinds of operations on operands. In C#, operators Can be categorized based upon their different functionality :
- Arithmetic Operators
- Relational Operators
- Logical Operators
- Bitwise Operators
- Assignment Operators
- Conditional Operator
In C#, Operators can also categorized based upon Number of Operands :
- Unary Operator: Operator that takes one operand to perform the operation.
- Binary Operator: Operator that takes two operands to perform the operation.
- Ternary Operator: Operator that takes three operands to perform the operation.
Arithmetic Operators
These are used to perform arithmetic/mathematical operations on operands. The Binary Operators falling in this category are :
- Addition: The ‘+’ operator adds two operands. For example, x+y.
- Subtraction: The ‘-‘ operator subtracts two operands. For example, x-y.
- Multiplication: The ‘*’ operator multiplies two operands. For example, x*y.
- Division: The ‘/’ operator divides the first operand by the second. For example, x/y.
- Modulus: The ‘%’ operator returns the remainder when first operand is divided by the second. For example, x%y.
Example:
- C#
Output:
Addition Operator: 15 Subtraction Operator: 5 Multiplication Operator: 50 Division Operator: 2 Modulo Operator: 0The ones falling into the category of Unary Operators are:
- Increment: The ‘++’ operator is used to increment the value of an integer. When placed before the variable name (also called pre-increment operator), its value is incremented instantly. For example, ++x.
And when it is placed after the variable name (also called post-increment operator), its value is preserved temporarily until the execution of this statement and it gets updated before the execution of the next statement. For example, x++.- Decrement: The ‘- -‘ operator is used to decrement the value of an integer. When placed before the variable name (also called pre-decrement operator), its value is decremented instantly. For example, – -x.
And when it is placed after the variable name (also called post-decrement operator), its value is preserved temporarily until the execution of this statement and it gets updated before the execution of the next statement. For example, x- –.Example:
- C#
Output:
a is 11 and res is 10 a is 10 and res is 11 a is 11 and res is 11 a is 10 and res is 10Relational Operators
Relational operators are used for comparison of two values. Let’s see them one by one:
- ‘=='(Equal To) operator checks whether the two given operands are equal or not. If so, it returns true. Otherwise it returns false. For example, 5==5 will return true.
- ‘!='(Not Equal To) operator checks whether the two given operands are equal or not. If not, it returns true. Otherwise it returns false. It is the exact boolean complement of the ‘==’ operator. For example, 5!=5 will return false.
- ‘>'(Greater Than) operator checks whether the first operand is greater than the second operand. If so, it returns true. Otherwise it returns false. For example, 6>5 will return true.
- ‘<‘(Less Than) operator checks whether the first operand is lesser than the second operand. If so, it returns true. Otherwise it returns false. For example, 6<5 will return false.
- ‘>='(Greater Than Equal To) operator checks whether the first operand is greater than or equal to the second operand. If so, it returns true. Otherwise it returns false. For example, 5>=5 will return true.
- ‘<='(Less Than Equal To) operator checks whether the first operand is lesser than or equal to the second operand. If so, it returns true. Otherwise it returns false. For example, 5<=5 will also return true.
Example:
- C#
Output:
Equal to Operator: False Greater than Operator: False Less than Operator: True Greater than or Equal to: False Lesser than or Equal to: True Not Equal to Operator: TrueLogical Operators
They are used to combine two or more conditions/constraints or to complement the evaluation of the original condition in consideration. They are described below:
- Logical AND: The ‘&&’ operator returns true when both the conditions in consideration are satisfied. Otherwise it returns false. For example, a && b returns true when both a and b are true (i.e. non-zero).
- Logical OR: The ‘||’ operator returns true when one (or both) of the conditions in consideration is satisfied. Otherwise it returns false. For example, a || b returns true if one of a or b is true (i.e. non-zero). Of course, it returns true when both a and b are true.
- Logical NOT: The ‘!’ operator returns true the condition in consideration is not satisfied. Otherwise it returns false. For example, !a returns true if a is false, i.e. when a=0.
Example:
- C#
Output:
AND Operator: False OR Operator: True NOT Operator: FalseBitwise Operators
In C#, there are 6 bitwise operators which work at bit level or used to perform bit by bit operations. Following are the bitwise operators :
- & (bitwise AND) Takes two numbers as operands and does AND on every bit of two numbers. The result of AND is 1 only if both bits are 1.
- | (bitwise OR) Takes two numbers as operands and does OR on every bit of two numbers. The result of OR is 1 any of the two bits is 1.
- ^ (bitwise XOR) Takes two numbers as operands and does XOR on every bit of two numbers. The result of XOR is 1 if the two bits are different.
- << (left shift) Takes two numbers, left shifts the bits of the first operand, the second operand decides the number of places to shift.
- >> (right shift) Takes two numbers, right shifts the bits of the first operand, the second operand decides the number of places to shift.
Example:
- C#
Output:
Bitwise AND: 0 Bitwise OR: 15 Bitwise XOR: 15 Bitwise Complement: -6 Bitwise Left Shift: 20 Bitwise Right Shift: 1Assignment Operators
Assignment operators are used to assigning a value to a variable. The left side operand of the assignment operator is a variable and right side operand of the assignment operator is a value. The value on the right side must be of the same data-type of the variable on the left side otherwise the compiler will raise an error.
Different types of assignment operators are shown below:
- “=”(Simple Assignment): This is the simplest assignment operator. This operator is used to assign the value on the right to the variable on the left.
Example:a = 10; b = 20; ch = 'y';
- “+=”(Add Assignment): This operator is combination of ‘+’ and ‘=’ operators. This operator first adds the current value of the variable on left to the value on the right and then assigns the result to the variable on the left.
Example:(a += b) can be written as (a = a + b)If initially value stored in a is 5. Then (a += 6) = 11.
- “-=”(Subtract Assignment): This operator is combination of ‘-‘ and ‘=’ operators. This operator first subtracts the current value of the variable on left from the value on the right and then assigns the result to the variable on the left.
Example:(a -= b) can be written as (a = a - b)If initially value stored in a is 8. Then (a -= 6) = 2.
- “*=”(Multiply Assignment): This operator is combination of ‘*’ and ‘=’ operators. This operator first multiplies the current value of the variable on left to the value on the right and then assigns the result to the variable on the left.
Example:(a *= b) can be written as (a = a * b)If initially value stored in a is 5. Then (a *= 6) = 30.
- “/=”(Division Assignment): This operator is combination of ‘/’ and ‘=’ operators. This operator first divides the current value of the variable on left by the value on the right and then assigns the result to the variable on the left.
Example:(a /= b) can be written as (a = a / b)If initially value stored in a is 6. Then (a /= 2) = 3.
- “%=”(Modulus Assignment): This operator is combination of ‘%’ and ‘=’ operators. This operator first modulo the current value of the variable on left by the value on the right and then assigns the result to the variable on the left.
Example:(a %= b) can be written as (a = a % b)If initially value stored in a is 6. Then (a %= 2) = 0.
- “<<=”(Left Shift Assignment) : This operator is combination of ‘<<‘ and ‘=’ operators. This operator first Left shift the current value of the variable on left by the value on the right and then assigns the result to the variable on the left.
Example:(a <<= 2) can be written as (a = a << 2)If initially value stored in a is 6. Then (a <<= 2) = 24.
- “>>=”(Right Shift Assignment) : This operator is combination of ‘>>’ and ‘=’ operators. This operator first Right shift the current value of the variable on left by the value on the right and then assigns the result to the variable on the left.
Example:(a >>= 2) can be written as (a = a >> 2)If initially value stored in a is 6. Then (a >>= 2) = 1.
- “&=”(Bitwise AND Assignment): This operator is combination of ‘&’ and ‘=’ operators. This operator first “Bitwise AND” the current value of the variable on the left by the value on the right and then assigns the result to the variable on the left.
Example:(a &= 2) can be written as (a = a & 2)If initially value stored in a is 6. Then (a &= 2) = 2.
- “^=”(Bitwise Exclusive OR): This operator is combination of ‘^’ and ‘=’ operators. This operator first “Bitwise Exclusive OR” the current value of the variable on left by the value on the right and then assigns the result to the variable on the left.
Example:(a ^= 2) can be written as (a = a ^ 2)If initially value stored in a is 6. Then (a ^= 2) = 4.
- “|=”(Bitwise Inclusive OR) : This operator is combination of ‘|’ and ‘=’ operators. This operator first “Bitwise Inclusive OR” the current value of the variable on left by the value on the right and then assigns the result to the variable on the left.
Example :(a |= 2) can be written as (a = a | 2)If initially, value stored in a is 6. Then (a |= 2) = 6.
Example:
- C#
Output :
Add Assignment Operator: 25 Subtract Assignment Operator: 15 Multiply Assignment Operator: 75 Division Assignment Operator: 5 Modulo Assignment Operator: 0 Left Shift Assignment Operator: 32 Right Shift Assignment Operator: 2 Bitwise AND Assignment Operator: 4 Bitwise Exclusive OR Assignment Operator: 8 Bitwise Inclusive OR Assignment Operator: 12Conditional Operator
It is ternary operator which is a shorthand version of if-else statement. It has three operands and hence the name ternary. It will return one of two values depending on the value of a Boolean expression.
Syntax:
condition ? first_expression : second_expression;Explanation:
condition: It must be evaluated to true or false.
If the condition is true
first_expression is evaluated and becomes the result.
If the condition is false,
second_expression is evaluated and becomes the result.Example:
- C#
Output :
Result: 10 Result: 5
C# Decision Making (if, if-else, if-else-if ladder, nested if, switch, nested switch)
Decision Making in programming is similar to decision making in real life. In programming too, a certain block of code needs to be executed when some condition is fulfilled.
A programming language uses control statements to control the flow of execution of program based on certain conditions. These are used to cause the flow of execution to advance and branch based on changes to the state of a program.
The conditional statements of C#:
IF Statement
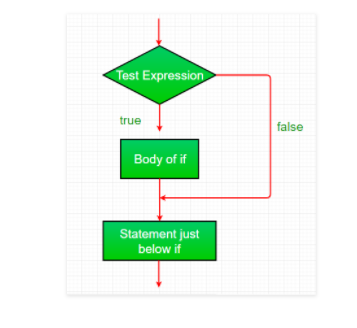
The if statement checks the given condition. If the condition evaluates to be true then the block of code/statements will execute otherwise not.
Syntax:
if(condition)
     {
         //code to be executed
     }
Note: If the curly brackets { } are not used with if statements then the statement just next to it is only considered associated with the if statement.
Example:
if (condition)
   statement 1;
statement 2;
In this example, only statement 1 is considered to be associated with the if statement.
Flowchart:
Example:
Csharp
Output:
GeeksForGeeks
IF – else Statement
The if statement evaluates the code if the condition is true but what if the condition is not true, here comes the else statement. It tells the code what to do when the if condition is false.
Syntax:
    if(condition)
    {
      // code if condition is true
    }
    else
    {
      // code if condition is false
    }
Flowchart:

Example:
Csharp
Output:
Geeks
If – else – if ladder Statement
The if-else-if ladder statement executes one condition from multiple statements. The execution starts from top and checked for each if condition. The statement of if block will be executed which evaluates to be true. If none of the if condition evaluates to be true then the last else block is evaluated.
Syntax:
        if(condition1)
        {
            // code to be executed if condition1 is true
        }
        else if(condition2)
        {
            // code to be executed if condition2 is true
        }
        else if(condition3)
        {
            // code to be executed if condition3 is true
        }
        ...
        else
        {
            // code to be executed if all the conditions are false
        }
Flowchart:

Example:
Csharp
Output:
i is 20
Nested – If Statement
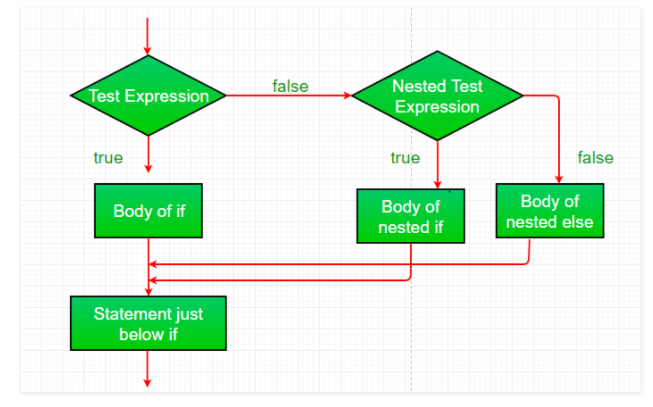
if statement inside an if statement is known as nested if. if statement in this case is the target of another if or else statement. When more than one condition needs to be true and one of the condition is the sub-condition of parent condition, nested if can be used.
Syntax:
        if (condition1)
        {
             // code to be executed
             // if condition2 is true
             if (condition2)
             {
                 // code to be executed
                 // if condition2 is true
             }
        }
Flowchart:
Example:
csharp
Output:
i is smaller than 12 too
Switch Statement
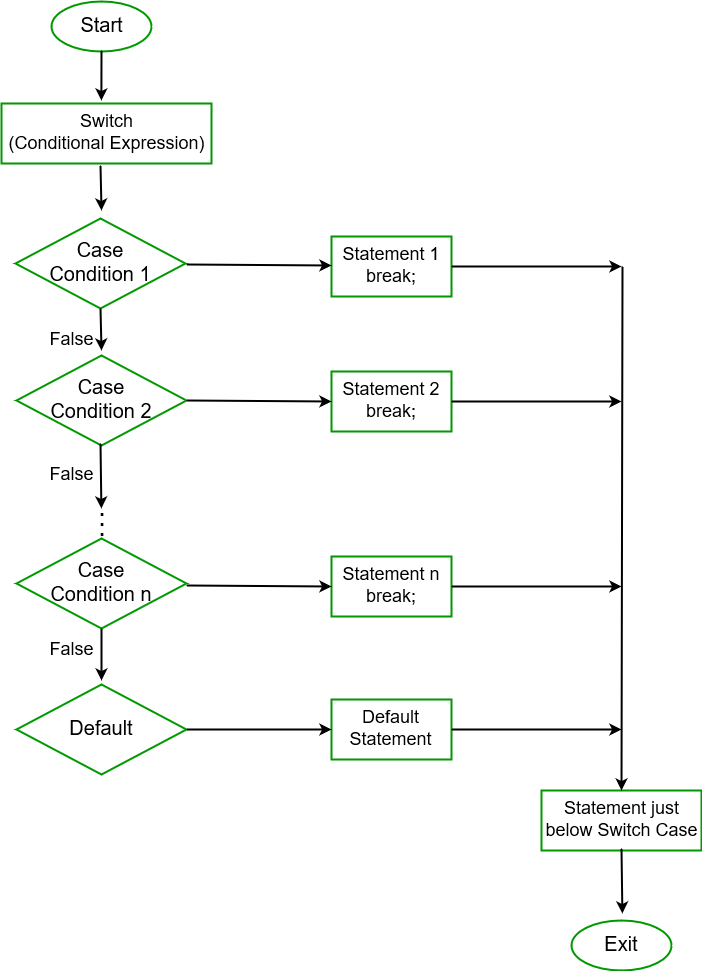
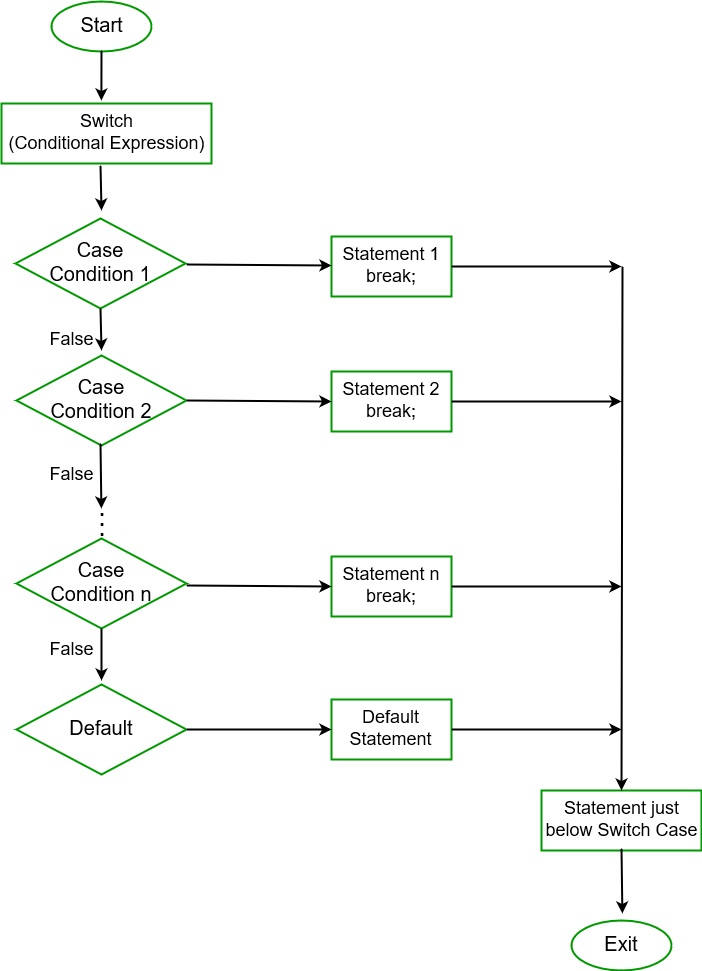
Switch statement is an alternative to long if-else-if ladders. The expression is checked for different cases and the one match is executed. break statement is used to move out of the switch. If the break is not used, the control will flow to all cases below it until break is found or switch comes to an end. There is default case (optional) at the end of switch, if none of the case matches then default case is executed.
Syntax:
switch (expression)
 {
case value1: // statement sequence
             break;
case value2: // statement sequence
             break;
.
.
.
case valueN: // statement sequence
             break;
default: // default statement sequence
}
Flow Diagram of Switch – case :
Example:
Csharp
Output:
case 30
Nested switch
Nested Switch case are allowed in C# . In this case, switch is present inside other switch case. Inner switch is present in one of the cases in parent switch.
Example:
Csharp
Output:
5
4
3
Switch Statement in C#
In C#, Switch statement is a multiway branch statement. It provides an efficient way to transfer the execution to different parts of a code based on the value of the expression. The switch expression is of integer type such as int, char, byte, or short, or of an enumeration type, or of string type. The expression is checked for different cases and the one match is executed.
Syntax:
switch (expression) { case value1: // statement sequence break; case value2: // statement sequence break; . . . case valueN: // statement sequence break; default: // default statement sequence }Flow Chart:
Important points to remember:
- In C#, duplicate case values are not allowed.
- The data type of the variable in the switch and value of a case must be of the same type.
- The value of a case must be a constant or a literal. Variables are not allowed.
- The break in switch statement is used to terminate the current sequence.
- The default statement is optional and it can be used anywhere inside the switch statement.
- Multiple default statements are not allowed.
Example:
Output:case 5Why do we use Switch Statements instead of if-else statements?
We use a switch statement instead of if-else statements because if-else statement only works for a small number of logical evaluations of a value. If you use if-else statement for a larger number of possible conditions then, it takes more time to write and also become difficult to read.
Example: Using if-else-if statement
Output:Category is OOPS ConceptExplanation: As shown in the above program the code is not excessive but, it looks complicated to read and took more time to write. So we use a switch statement to save time and write optimized code. Using switch statement will provide a better readability of code.
Example: Using Switch Statement
Output:Category is OOPS ConceptUsing goto in the Switch Statement
You can also use goto statement in place of the break in the switch statement. Generally, we use a break statement to exit from the switch statement. But in some situations, the default statement is required to be executed, so we use the goto statement. It allows executing default condition in the switch statement. The goto statement is also used to jump to a labeled location in C# program.
Example:
Output:Bonjour Namaste Entered value is: 2
Loops in C#
Looping in a programming language is a way to execute a statement or a set of statements multiple times depending on the result of the condition to be evaluated to execute statements. The result condition should be true to execute statements within loops. Loops are mainly divided into two categories: Entry Controlled Loops: The loops in which condition to be tested is present in beginning of loop body are known as Entry Controlled Loops. while loop and for loop are entry controlled loops. 1. while loop The test condition is given in the beginning of the loop and all statements are executed till the given Boolean condition satisfies when the condition becomes false, the control will be out from the while loop. Syntax:
while (boolean condition)
{
   loop statements...
}
Flowchart: 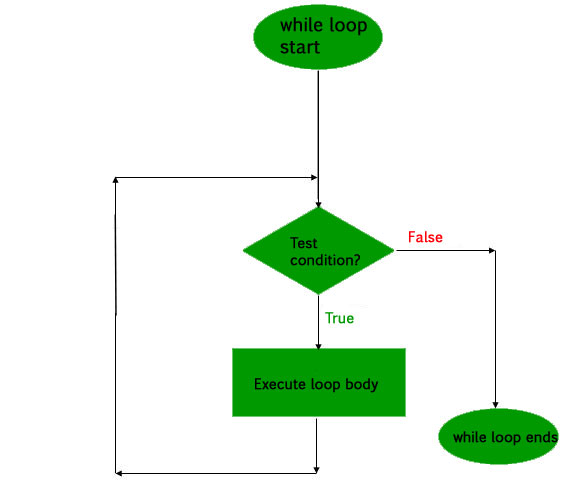 Example:
csharp
Output:
GeeksforGeeks
GeeksforGeeks
GeeksforGeeks
GeeksforGeeks
Time Complexity: O(1)
Auxiliary Space: O(1)
2. for loop for loop has similar functionality as while loop but with different syntax. for loops are preferred when the number of times loop statements are to be executed is known beforehand. The loop variable initialization, condition to be tested, and increment/decrement of the loop variable is done in one line in for loop thereby providing a shorter, easy to debug structure of looping.
for (loop variable initialization ; testing condition;
                              increment / decrement)
{
    // statements to be executed
}
Flowchart:  1. Initialization of loop variable: Th expression / variable controlling the loop is initialized here. It is the starting point of for loop. An already declared variable can be used or a variable can be declared, local to loop only. 2. Testing Condition: The testing condition to execute statements of loop. It is used for testing the exit condition for a loop. It must return a boolean value true or false. When the condition became false the control will be out from the loop and for loop ends. 3. Increment / Decrement: The loop variable is incremented/decremented according to the requirement and the control then shifts to the testing condition again. Note: Initialization part is evaluated only once when the for loop starts. Example:
csharp
Output:
GeeksforGeeks
GeeksforGeeks
GeeksforGeeks
GeeksforGeeks
Time Complexity: O(1)
Auxiliary Space: O(1)
Exit Controlled Loops: The loops in which the testing condition is present at the end of loop body are termed as Exit Controlled Loops. do-while is an exit controlled loop. Note: In Exit Controlled Loops, loop body will be evaluated for at-least one time as the testing condition is present at the end of loop body. 1. do-while loop do while loop is similar to while loop with the only difference that it checks the condition after executing the statements, i.e it will execute the loop body one time for sure because it checks the condition after executing the statements. Syntax :
do
{
    statements..
}while (condition);
Flowchart: 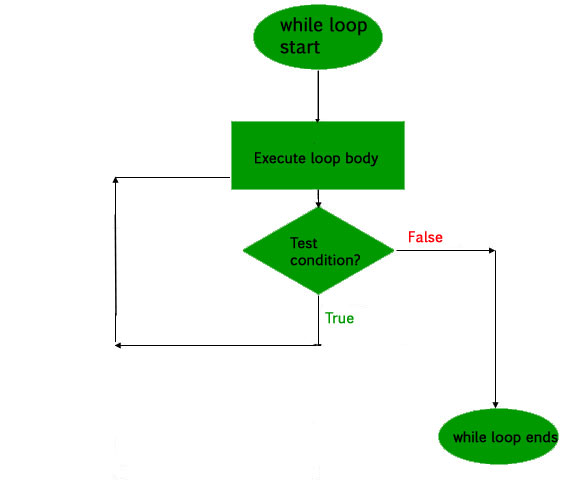 Example:
csharp
Output:
GeeksforGeeks
Infinite Loops: The loops in which the test condition does not evaluate false ever tend to execute statements forever until an external force is used to end it and thus they are known as infinite loops. Example:
csharp
Output:
This is printed infinite times
This is printed infinite times
This is printed infinite times
This is printed infinite times
This is printed infinite times
This is printed infinite times
This is printed infinite times
..........
Nested Loops: When loops are present inside the other loops, it is known as nested loops. Example:
csharp
Output:
GeeksforGeeks
continue statement: continue statement is used to skip over the execution part of loop on a certain condition and move the flow to next updation part. Flowchart: 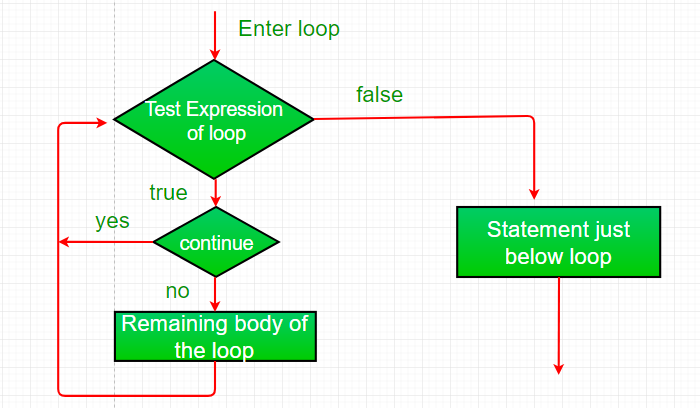 Example:
csharp
Output:
GeeksforGeeks
C# | Jump Statements (Break, Continue, Goto, Return and Throw)
In C#, Jump statements are used to transfer control from one point to another point in the program due to some specified code while executing the program. There are five keywords in the Jump Statements:
- break
- continue
- goto
- return
- throw
break statement
The break statement is used to terminate the loop or statement in which it present. After that, the control will pass to the statements that present after the break statement, if available. If the break statement present in the nested loop, then it terminates only those loops which contains break statement.
Flowchart:
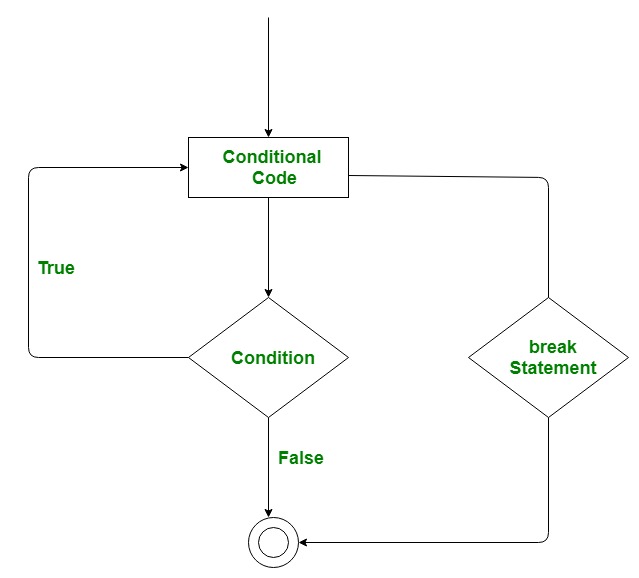
Example:
- CSharp
GeeksforGeeks
GeeksforGeeks
continue statement
This statement is used to skip over the execution part of the loop on a certain condition. After that, it transfers the control to the beginning of the loop. Basically, it skips its following statements and continues with the next iteration of the loop.
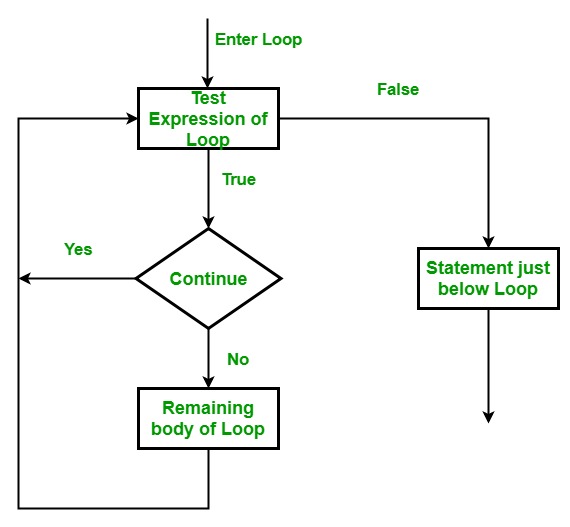
Example:
- CSharp
1
2
3
5
6
7
8
9
10
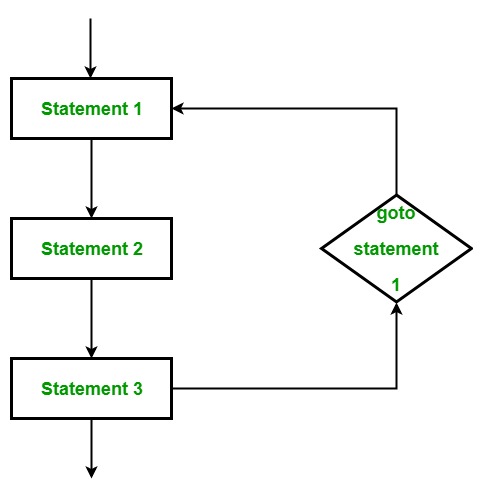
goto statement
This statement is used to transfer control to the labeled statement in the program. The label is the valid identifier and placed just before the statement from where the control is transferred.
Example:
- CSharp
case 20
case 5
return statement
This statement terminates the execution of the method and returns the control to the calling method. It returns an optional value. If the type of method is void, then the return statement can be excluded.
Example:
- CSharp
The addition is 4
throw statement
This is used to create an object of any valid exception class with the help of new keyword manually. The valid exception must be derived from the Exception class.
Example:
- CSharp
Exception Message
Object-Oriented Programming (OOP):
C# is designed around the principles of object-oriented programming, which allows developers to model real-world entities and their interactions using classes and objects.
Syntax and Structure:
C# syntax is similar to that of other C-like languages, making it relatively easy to learn if you're familiar with languages like C++ or Java.
It uses curly braces {} to define code blocks and semicolons ; to separate statements.
.NET Framework and .NET Core/.NET 5+:
Originally developed for the .NET Framework, C# applications can run on Windows and interact with various Microsoft technologies.
With the introduction of .NET Core and later .NET 5+, C# has become more cross-platform, enabling development on Windows, macOS, and Linux.
Visual Studio IDE:
Microsoft's Visual Studio is the primary integrated development environment (IDE) for C# development, providing tools for coding, debugging, and designing user interfaces.
Language Features:
C# includes modern language features like generics, delegates, lambdas, events, properties, and more, which enhance code clarity and expressiveness.
Asynchronous Programming:
C# has built-in support for asynchronous programming through the async and await keywords, making it easier to write responsive applications.
Windows Applications:
C# is commonly used for building Windows applications, including desktop applications and Universal Windows Platform (UWP) apps.
Web Applications:
ASP.NET, a web framework developed by Microsoft, allows developers to build dynamic web applications using C# on the server side.
Game Development:
C# is widely used in game development, especially in conjunction with the Unity game engine.
Language Interoperability:
C# is designed to work well with other .NET languages like Visual Basic .NET (VB.NET) and F#.
It can also interface with existing native code using platform invoke (P/Invoke) or COM interoperability.
Memory Management:
C# uses automatic memory management through a process called garbage collection, which helps developers avoid manual memory management pitfalls.
Security and Type Safety:
C# emphasizes type safety and provides features like managed code execution, which contributes to the security of applications.
Standard Libraries:
C# has a rich standard library that provides classes and functions for common tasks, such as file I/O, networking, data serialization, and more.
Continuous Evolution:




0 Comments